Database schema migrations are a critical but often risky part of application development. Traditional migration tools can lock tables, cause downtime, and make rollbacks difficult, especially for applications that require high availability. pgroll is an open-source CLI tool that solves this problem for Postgres, enabling zero-downtime, reversible schema changes.
This guide will walk you through understanding pgroll, and how to use it effectively in your development workflow to ensure safe, continuous database migrations without service interruptions.
What is pgroll?
pgroll is an open-source command-line tool for Postgres that enables zero-downtime, reversible schema migrations by allowing multiple schema versions to coexist during updates, so client applications remain uninterrupted even during breaking changes. It manages complex migrations safely without locking the database and supports instant rollbacks if needed.
Key features
- Zero downtime migrations:
pgrollemploys an expand/contract workflow, ensuring changes are applied without taking your application offline or locking database tables. - Instant, reversible changes: Active migrations can be instantly rolled back with a single command, providing a critical safety net for production deployments.
- Multi-version schema support:
pgrollallows old and new versions of your schema to coexist simultaneously. This decouples application and database deployments, as new application versions can use the new schema while legacy versions continue to function on the old one. - Declarative migrations: You define the desired end state of your schema in simple
yamlorjsonfiles.pgrollhandles the complex, lock-safe SQL execution required to achieve that state. - Automated data backfilling: When adding constraints like
NOT NULLto a column with existing data,pgrollautomates the entire backfilling process in the background without blocking writes.
pgroll is the ideal solution for environments with high-availability requirements where schema changes must be deployed frequently and safely.
Why not traditional migration strategies?
To appreciate pgroll's approach, it helps to understand the trade-offs of conventional migration methods. Schema migrations in Postgres typically follow one of two strategies:
Strategy 1: Scheduled downtime (The maintenance window)
This method prioritizes operational simplicity at the cost of service availability. It is only viable for applications where scheduled downtime is acceptable.
Process:
- Halt service: Stop application servers to prevent all database writes.
- Apply migration: Execute the migration script, which often acquires
ACCESS EXCLUSIVElocks. - Deploy new code: Deploy the application version compatible with the new schema.
- Restore service: Restart application servers.
Challenges:
- Service interruption: Unacceptable for high-availability systems.
- High-risk, high-pressure event: Any failure during the migration extends the outage.
- Difficult rollbacks: Reverting a failed migration is operationally complex, often requiring a database restore.
Strategy 2: Manual Zero-downtime migration (The expand/contract pattern)
This advanced strategy avoids downtime but transfers complexity to the application layer and development teams.
Process:
- Expand phase: Apply only backward-compatible changes (e.g., add a new column as
NULL). Deploy new application code that handles both schema versions, often requiring complex dual-write logic. - Transition phase: Run a custom script to backfill data into the new column, usually in small batches to avoid table locks.
- Contract phase: Once data is migrated and consistent, apply the breaking change (e.g., add a
NOT NULLconstraint). - Cleanup: Deploy a final application version that removes the dual-write logic and run another migration to drop the old column.
Challenges:
- Engineering overhead: This multi-stage process is slow and requires development effort to manage dual-writes, backfills, and feature flags.
- Operational complexity: The process is error-prone and requires coordination across multiple deployments.
- Data consistency risks: Bugs in the application's backfill or dual-write logic can lead to silent data corruption.
How pgroll solves these problems
pgroll transforms the complex, manual migration process into a simple, automated one. It achieves this by codifying the expand/contract pattern, allowing you to focus on defining what you want to change, while pgroll handles how to apply it safely.
The pgroll migration lifecycle
A typical migration with pgroll involves a clear, two-phase process that separates database changes from application deployment, ensuring safety and reversibility.
Step 1: Define your migration
You start by creating a declarative migration file in yaml or json that defines the desired schema changes.
Step 2: Start the migration (pgroll start) - The "Expand" phase
Running pgroll start <migration-file> initiates the migration.
- What happens:
pgrollapplies only additive (non-breaking) changes. For breaking changes like adding aNOT NULLconstraint, it creates a temporary helper column, backfills data, and sets up triggers to keep both old and new columns synchronized. - The result: A new, versioned schema is created and becomes accessible. The old schema version remains fully operational.
Step 3: Deploy your new application code
With the new schema available, you can safely deploy your new application.
- What you do: Configure your new application instances to use the new schema version by setting their
search_pathconnection parameter. You can get the latest schema name by runningpgroll latest schema. Learn more about this in the Connecting your application to the new schema version section. - The key benefit: During this phase, both old and new application versions can run concurrently against their respective schema versions, enabling phased rollouts like canary or blue-green deployments.
Step 4: Complete the migration (pgroll complete) - The "Contract" phase
Once your new application is stable and no traffic is hitting instances that use the old schema, you finalize the process.
- What happens: Running
pgroll completeperforms the "contract" steps. It removes the old schema version, drops temporary columns and triggers, and makes the schema changes permanent. - The result: The migration is complete, and the database schema is now in its final, clean state.
Optionally, you can also run pgroll rollback at any point before completing the migration to revert to the previous schema version. This is a critical safety feature that allows you to quickly undo changes if issues arise during the migration process.
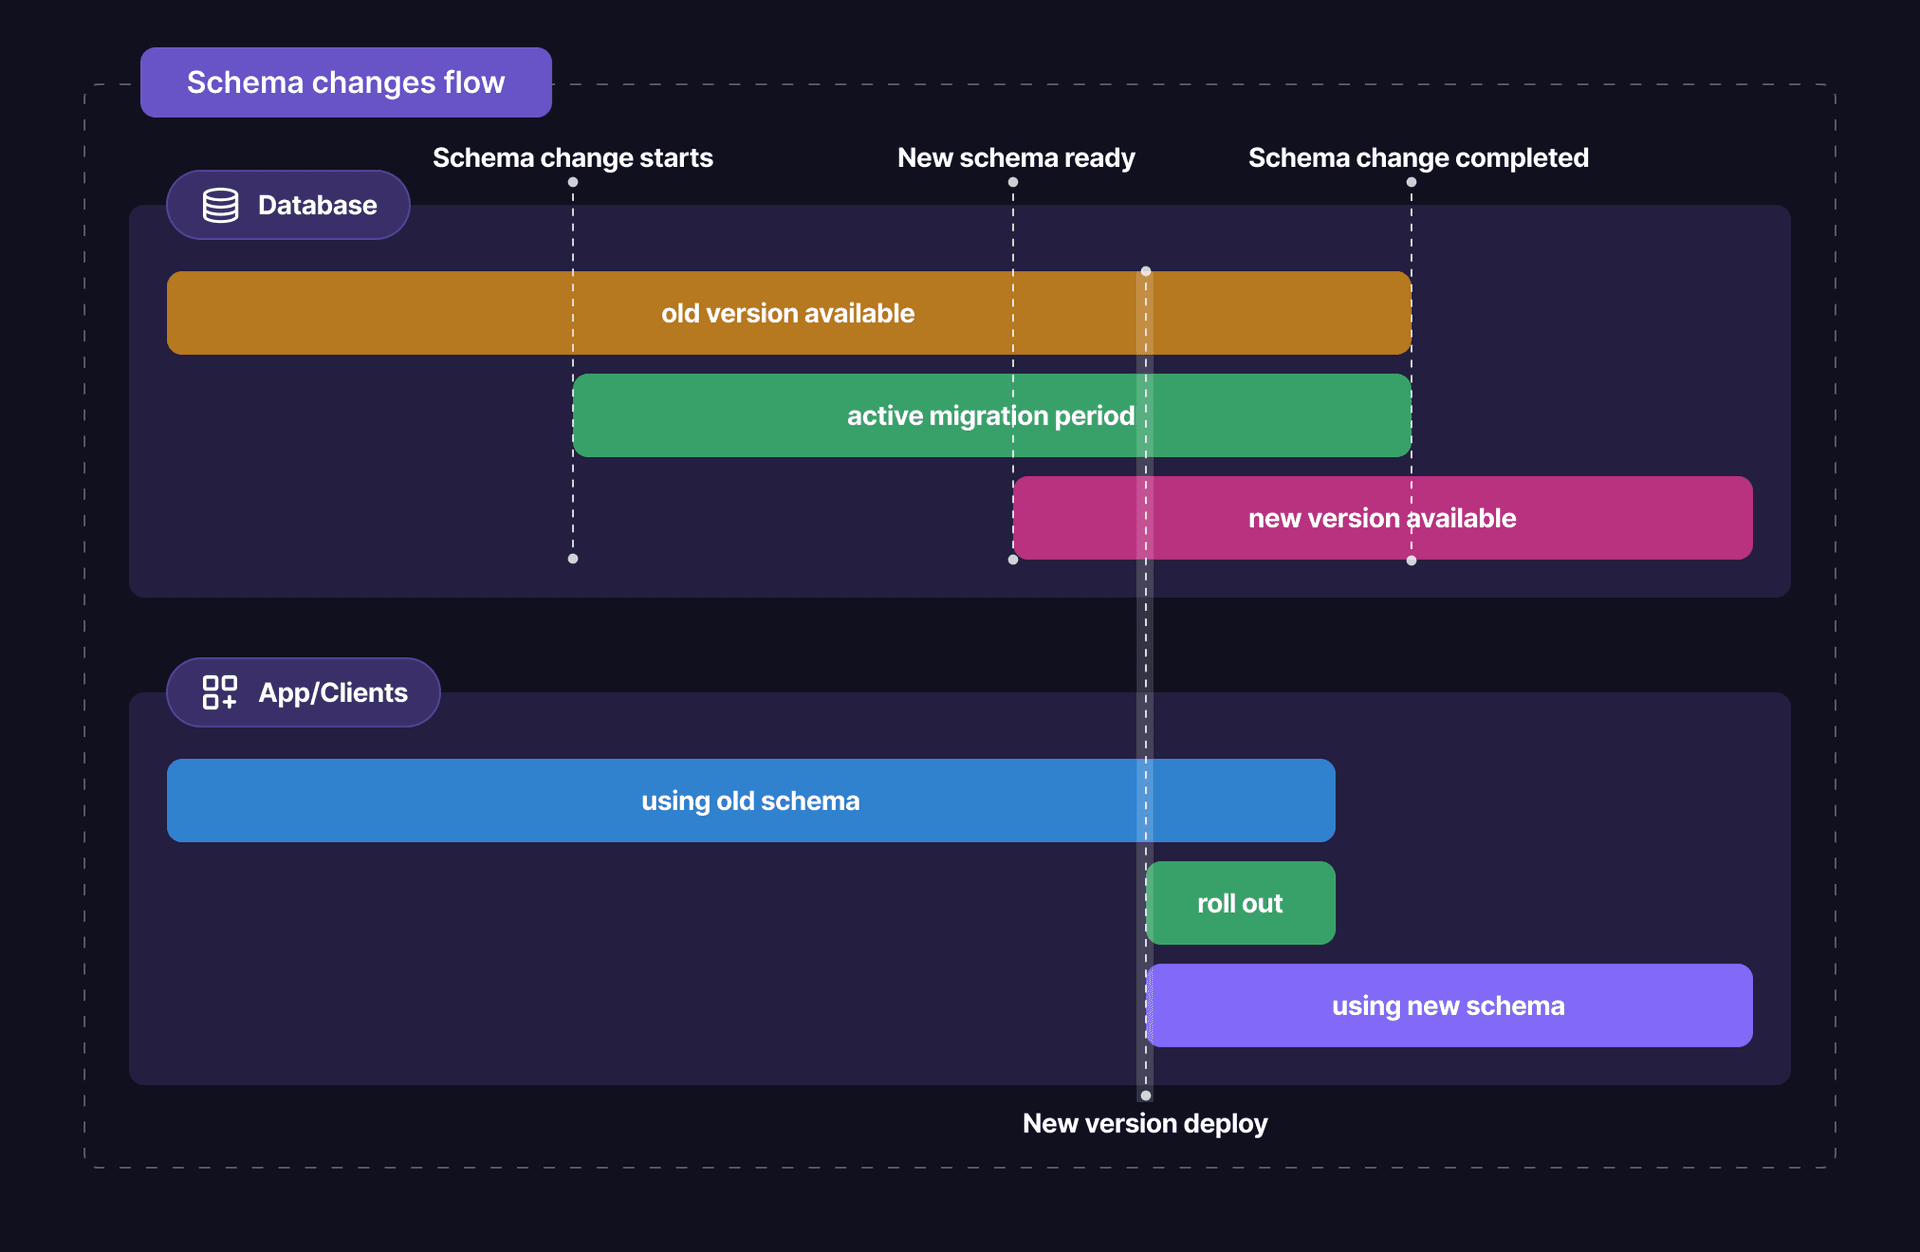
Image source: pgroll GitHub repository
How pgroll manages multiple schema versions
For each migration, pgroll creates a new, versioned schema (e.g., public_01_initial, public_02_add_column). These schemas do not contain the physical tables themselves but rather views that point to the underlying tables in your main schema (e.g., public).
This abstracts the schema's structure. For example, when you rename a column, the new version schema's view presents the column with its new name, while the old version schema's view continues to show the old name. This allows different application versions to interact with the same underlying data through different schema lenses, completely unaware of the ongoing migration.
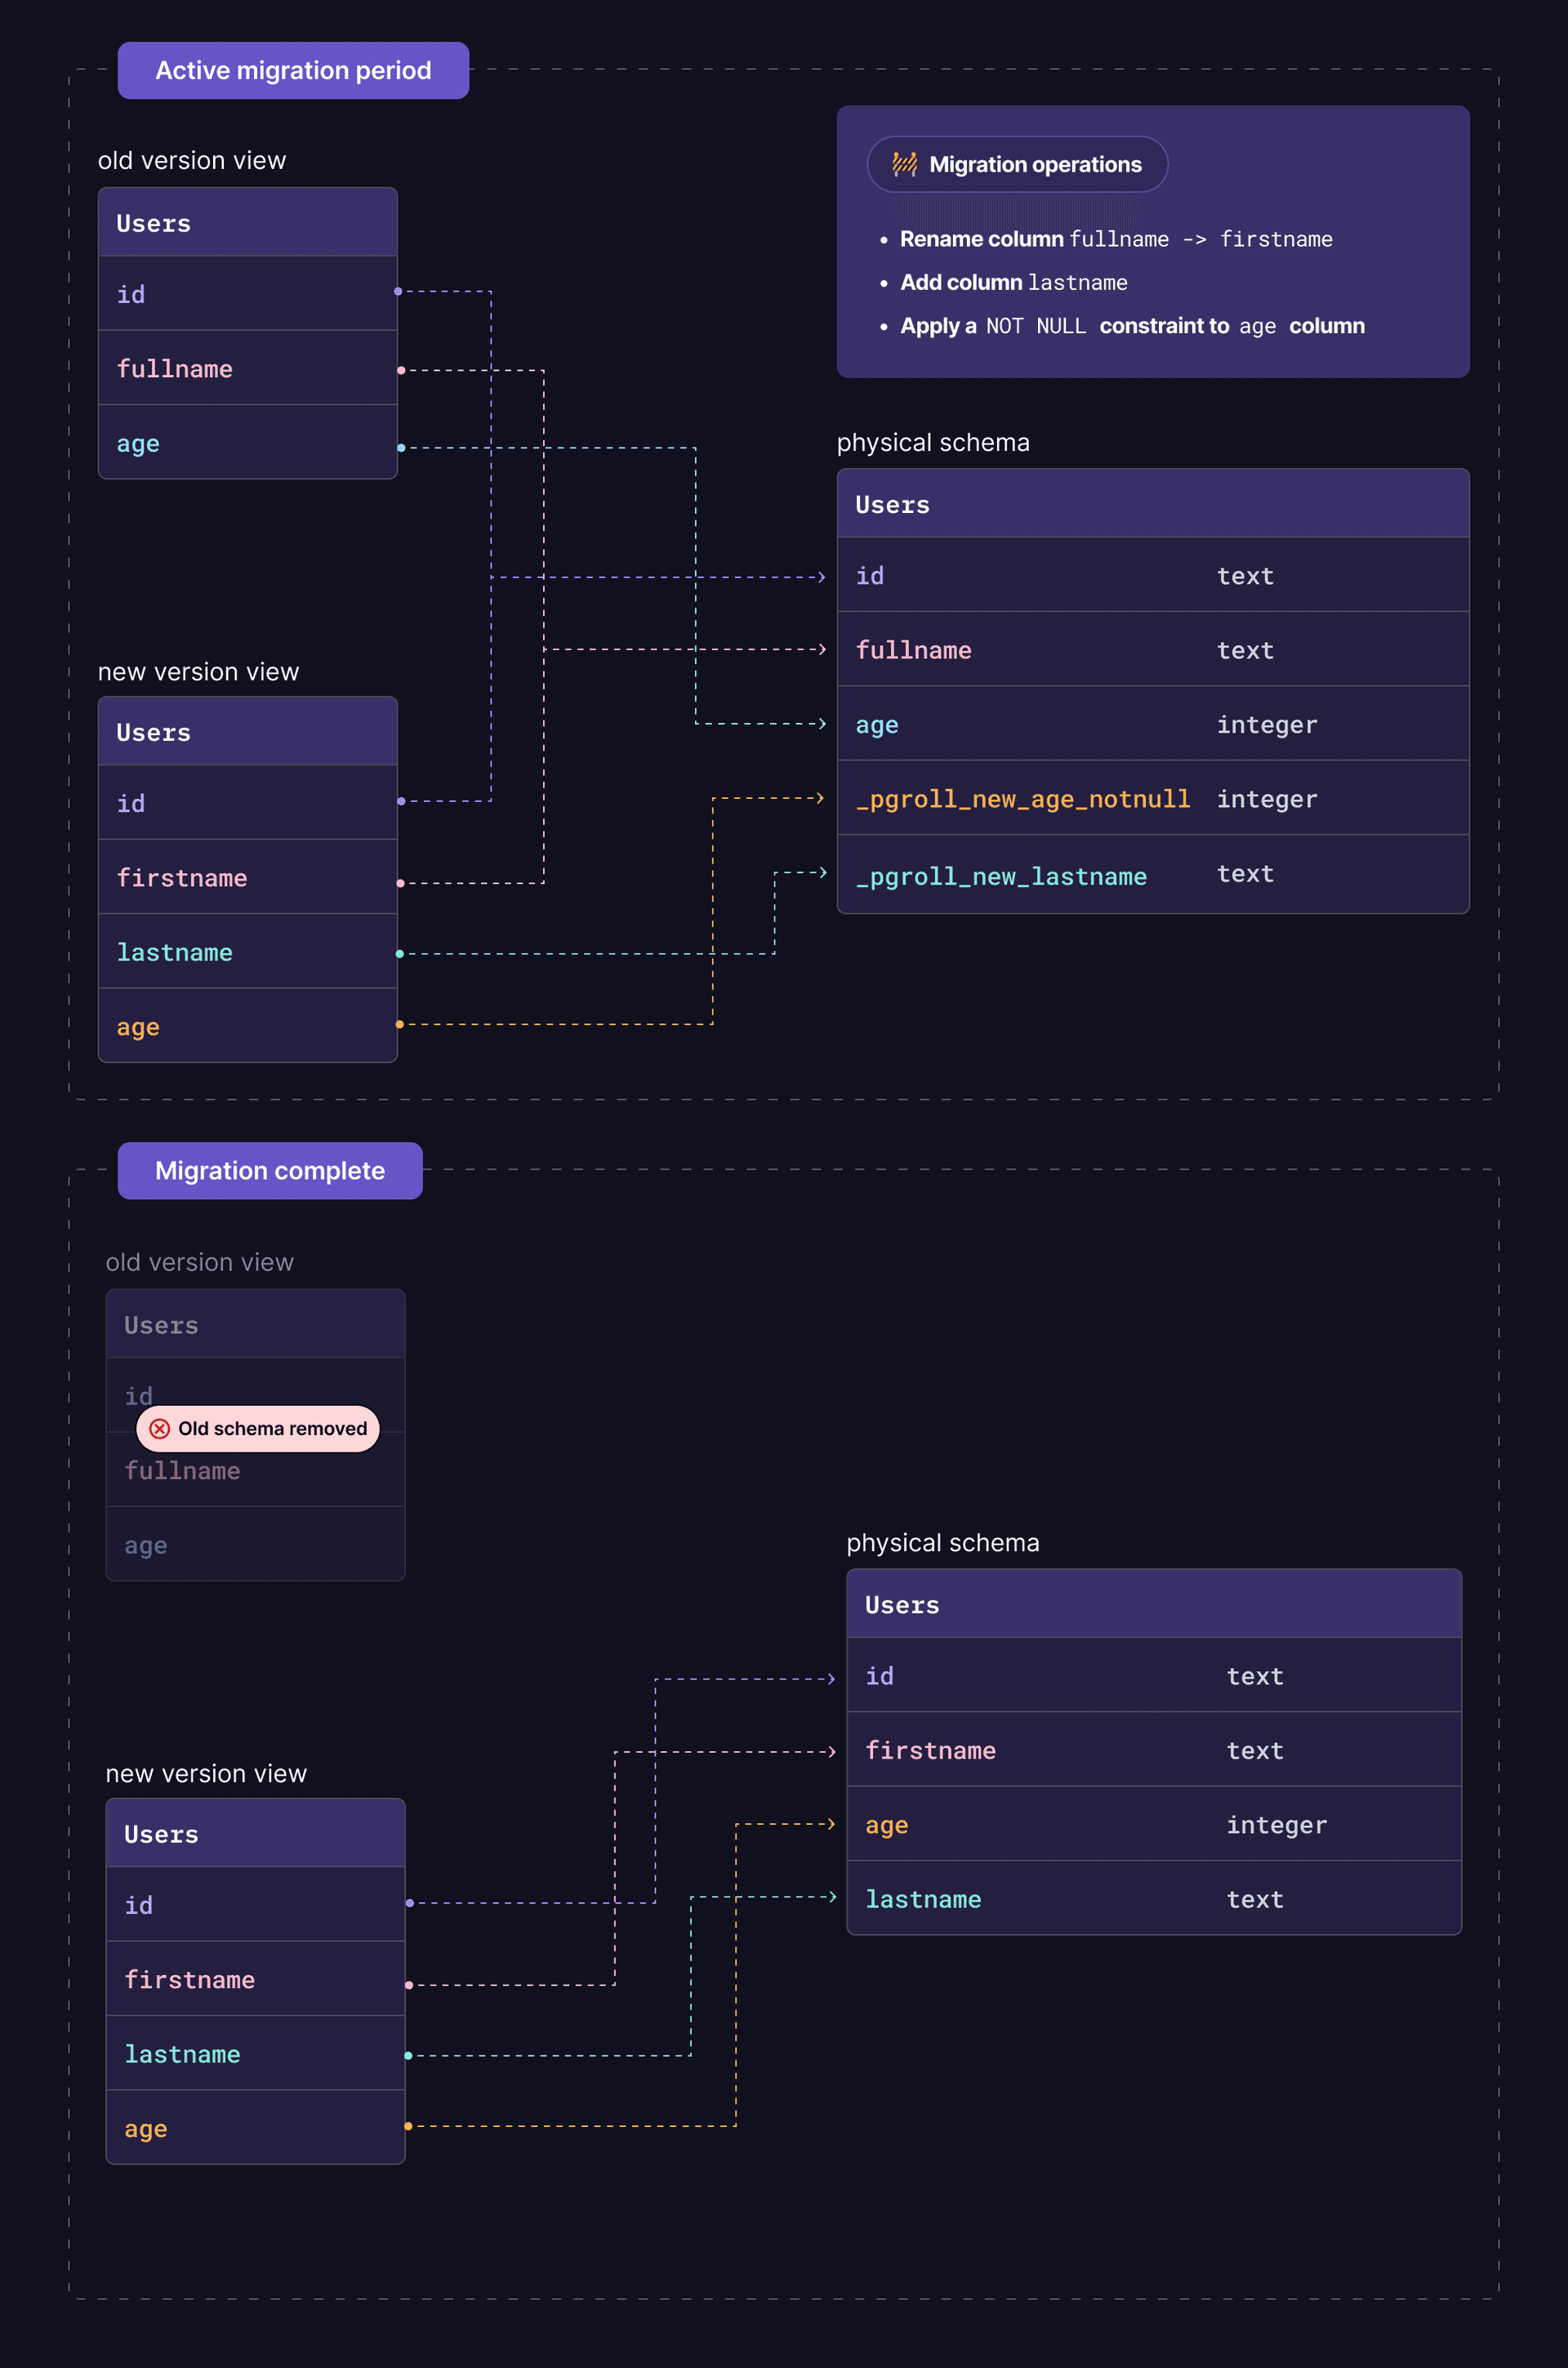
Image source: pgroll GitHub repository
Getting started
Now that you understand the basics, let's dive into using pgroll for schema migrations in a Neon Postgres database. This guide will take you through installing and setting up pgroll, creating your first migration, and understanding how to manage schema changes safely.
Prerequisites
pgrollCLI installed: Follow the installation instructions below.- Neon Account and Project: A Neon account and a project with a running Postgres database. You can create a free Neon account and project at pg.new.
Step 1: Installation
You can install pgroll using various methods depending on your operating system and preferences. The recommended way is to use the pre-built binaries available for major platforms.
If you are on macOS, you can install pgroll using Homebrew:
brew tap xataio/pgroll
brew install pgroll
If you prefer to install from source, ensure you have Go installed and run:
go install github.com/xataio/pgroll@latestIf you need a pre-compiled binary for your platform, please refer to pgroll installation instructions.
Step 2: Initialize pgroll
pgroll requires a dedicated schema (by default, pgroll) to store its internal state. Initialize it by running the following command:
pgroll init --postgres-url "postgresql://<user>:<password>@<endpoint_hostname>.neon.tech:<port>/<dbname>?sslmode=require&channel_binding=require"Replace
<user>,<password>,<endpoint_hostname>,<port>, and<dbname>with your Neon database connection details. You can find these in the Neon Console under your project's Connect section. Learn more: Connect from any application
Step 3: Your first migration
Working with an existing database?
The following steps start by creating new tables. If you are applying pgroll to a database that already contains tables, you must first create a baseline of your existing schema. Please follow the instructions in the Onboarding an Existing Database section.
Migrations in pgroll are defined declaratively in yaml or json files. This means you specify what you want the end state of your schema to be, and pgroll handles the complex steps of how to get there safely.
Let's create a users table. Save the following content to a file named migrations/01_create_users.yaml:
# A list of one or more schema change operations
operations:
  # The first operation is to create a table
  - create_table:
      # The name of the table to create
      name: users
      # A list of column definitions for the table
      columns:
        - name: id
          type: serial
          pk: true
        - name: name
          type: varchar(255)
          unique: true
        - name: description
          type: text
          nullable: true
Understanding the migration syntax
Let's quickly break down the file you just created:
operations: This is the top-level key for a list of actionspgrollwill perform. A single migration file can contain multiple operations.create_table: This is a specificpgrolloperation. It defines a new table and its properties.columns: Insidecreate_table, this array defines each column'sname,type, and any constraints likepk(primary key),unique, ornullable.
This declarative approach is what allows pgroll to analyze the changes, manage locks intelligently, and perform migrations without downtime. For a complete list of all supported actions, such as alter_column or drop_index, see the official pgroll operations reference.
Coming from an ORM or SQL Scripts?
You don't always have to write these YAML files by hand. pgroll can automatically generate migrations from standard SQL files. We'll cover how to use this feature with tools like Drizzle in the Generating migrations from ORMs section.
Since this is the first migration, there's no "old" schema to preserve compatibility with, so we can start and complete it in one step using the --complete flag.
pgroll start migrations/01_create_users.yaml --postgres-url "postgresql://<user>:<password>@<endpoint_hostname>.neon.tech:<port>/<dbname>?sslmode=require&channel_binding=require" --completeStep 4: A breaking change (add NOT NULL constraint)
Now, let's make the description column non-nullable. This is a classic breaking change, as it introduces two immediate challenges that would cause downtime with a traditional migration tool:
- Existing data: The
userstable may already contain rows wheredescriptionisNULL, which would violate the new constraint. - Live application: Your running application code is still operating under the assumption that the column is nullable and may attempt to insert
NULLvalues, which would result in runtime errors.
This is precisely the type of scenario pgroll is designed to handle without disrupting your service. To perform this migration, we will use pgroll's ability to create a new schema version that temporarily allows NULL values while we backfill existing data. In this case, we must provide an up SQL expression to tell pgroll how to backfill any existing NULL values and a down expression to revert the changes in case of a rollback.
Create a new migration file named migrations/02_make_description_not_null.yaml with the following content:
operations:
  - alter_column:
      table: users
      column: description
      nullable: false
      up: SELECT CASE WHEN description IS NULL THEN 'No description provided' ELSE description END
      down: description
We'll now start the migration using pgroll start, which will perform the "expand" phase. This phase prepares the database for the breaking change without applying it yet.
pgroll start migrations/02_make_description_not_null.yaml --postgres-url "postgresql://<user>:<password>@<endpoint_hostname>.neon.tech:<port>/<dbname>?sslmode=require&channel_binding=require"At this point, pgroll has performed the "expand" phase:
- It created a temporary column
_pgroll_new_descriptionon theuserstable. - It backfilled this new column using your
upSQL, convertingNULLs to a valid string. - It created triggers to transparently sync writes between
descriptionand_pgroll_new_description. - It created a new schema version,
public_02_make_description_not_null, whose view exposes_pgroll_new_descriptionasdescription.
Your old applications can continue using the previous schema version, while you deploy new applications configured to use the new version.
Step 5: Connecting your application to the new schema version
The key to a zero-downtime rollout is updating your application to point to the new schema version. This is done by setting the search_path for the database connection.
First, you can get the name of the latest schema version directly from pgroll. This is ideal for use in CI/CD pipelines:
export PGROLL_SCHEMA_VERSION=$(pgroll latest --with-schema --postgres-url "postgresql://<user>:<password>@<endpoint_hostname>.neon.tech:<port>/<dbname>?sslmode=require&channel_binding=require")
echo $PGROLL_SCHEMA_VERSION
# Example output: public_02_make_description_not_null
You would then pass this environment variable (PGROLL_SCHEMA_VERSION) to your application during deployment.
Example: Configuring a TypeScript/Drizzle Application
To connect your application to a new schema version, you must configure your database client to use the correct search_path. Since Drizzle ORM does not have a built-in, session-level way to set this, the recommended approach is to wrap your queries within a transaction. This ensures the SET search_path command is executed for the current session before your application code queries the database.
Session-Based Connection Required
Setting the search_path is a session-level command. This means you must use a database driver that supports persistent, interactive sessions.
For Neon users, the stateless drizzle-orm/neon-http driver is not suitable for this task. You must use a session-based driver like postgres-js, node-postgres (pg), or the neon-serverless driver (which uses WebSockets).
Here are examples for three popular drivers. In each case, we assume the schema name (e.g., public_02_make_description_not_null) is passed to the application via an environment variable like PGROLL_SCHEMA_VERSION as shown above.
import { Pool, neonConfig } from '@neondatabase/serverless';
import { drizzle } from 'drizzle-orm/neon-serverless';
import { users } from './db/schema';
import ws from 'ws';
import 'dotenv/config';

// Required for WebSocket connections in Node.js
neonConfig.webSocketConstructor = ws;

// Get the target schema from environment variables
const schema = process.env.PGROLL_SCHEMA_VERSION || 'public';

const client = new Pool({
  connectionString: process.env.DATABASE_URL!,
});
const db = drizzle({ client });

async function getUsers() {
  try {
    // Wrap your query in a transaction to set the search_path
    const allUsers = await db.transaction(async (tx) => {
      await tx.execute(`SET search_path TO ${schema}`);
      return tx.select().from(users);
    });

    console.log(`Users from schema '${schema}':`, allUsers);
  } catch (error) {
    console.error('Error fetching users:', error);
  } finally {
    await client.end();
  }
}

getUsers();
The key pattern in all these examples is wrapping your database calls in a db.transaction. This guarantees that the SET search_path command and your actual queries are executed within the same database session, ensuring your application interacts with the correct pgroll version schema.
For examples in other languages and frameworks, please refer to the official pgroll documentation on integrating client applications.
Step 6: Complete the migration
Once all your application instances have been updated to use the new schema, you can safely complete the migration.
pgroll complete --postgres-url "postgresql://<user>:<password>@<endpoint_hostname>.neon.tech:<port>/<dbname>?sslmode=require&channel_binding=require"pgroll will now perform the "contract" phase: drop the old description column, rename _pgroll_new_description to description, apply the NOT NULL constraint permanently, and remove the temporary triggers and the old version schema.
Step 7: Rolling back
If you discover an issue after start but before complete, you can instantly and safely roll back the changes.
pgroll rollback --postgres-url "postgresql://<user>:<password>@<endpoint_hostname>.neon.tech:<port>/<dbname>?sslmode=require&channel_binding=require"This command removes the new version schema and all temporary structures, reverting the database to its exact state before the migration began. This operation has no impact on applications still using the old schema version.
Integrating pgroll into your workflow
pgroll is designed to fit seamlessly into modern development practices, including workflows with ORMs and CI/CD pipelines.
Generating migrations with ORMs
You don't need to write pgroll migrations by hand. Most ORMs can generate schema changes as raw SQL, which pgroll can then convert into its declarative format.
The key command is pgroll convert, which reads SQL statements and translates them into pgroll's YAML or JSON format.
Example: Drizzle ORM
A typical workflow with Drizzle ORM and pgroll involves the following steps:
-
Modify your drizzle schema: Start by making the desired changes to your schema definitions in your project's
db/schema.tsfile. -
Generate the SQL migration: Use the Drizzle Kit CLI to generate a standard SQL migration file from your schema changes.
npx drizzle-kit generateThis creates a new
.sqlfile in your migrations folder. -
Convert to a
pgrollmigration: Use thepgrollCLI to convert the generated SQL file intopgroll's declarative YAML format.pgroll convert <path-to-your-drizzle-generated.sql> > <path-to-your-new.yaml>Crucially, review the output YAML. For any breaking changes, you will likely need to manually provide the correct
upanddownSQL expression to handle data backfilling.Manual review required
The
convertcommand is a powerful starting point, but you may need to manually edit the output. For complex changes,pgrolloften createsTODOmarkers forup/downexpressions that it cannot infer automatically. Always review and complete the generated migration file. -
Start the migration: Apply the migration to your database using the
startcommand. This creates the new schema version alongside the old one without causing downtime.pgroll start <path-to-your-new.yaml> -
Test and deploy your new application:
- Fetch the new schema name using
pgroll latest schema. - In your CI/CD pipeline, deploy the new version of your application, configuring it to use the new schema via an environment variable (e.g.,
PGROLL_SCHEMA_VERSION). - This is the ideal stage for phased rollouts (canary, blue-green), as the old application version continues to run unaffected on the previous schema.
- Fetch the new schema name using
-
Validate and finalize:
- If an issue is found, you can instantly and safely revert the database changes with
pgroll rollback. This will not affect the running (old) application. - If the new application is stable, proceed with a full rollout.
- If an issue is found, you can instantly and safely revert the database changes with
-
Complete the migration: Once you are confident that no services are using the old schema, finalize the process by running:
pgroll completeThis removes the old schema version and cleans up all temporary columns and triggers, leaving your database in its new, permanent state.
This workflow of generating and converting SQL can be adapted for other ORMs like Sequelize, TypeORM, or Prisma that can output schema changes as SQL files.
Onboarding an existing database (baseline)
If you want to use pgroll on a project with an existing schema, you don't need to recreate its migration history. The baseline command establishes a starting point.
pgroll baseline 01_initial_schema ./migrationsThis command:
- Records the current schema state as the starting point in
pgroll's internal tables. - Creates an empty placeholder migration file (
01_initial_schema.yaml). - Does not apply any changes to your database.
You should then use a tool like pg_dump --schema-only to capture your current schema DDL and place it inside a sql operation within the placeholder file. All future migrations will now build upon this baseline.
Common migration operations
pgroll migrations consist of a list of declarative operations. Below are a few common examples.
Refer to the Official Documentation
The following examples showcase some of the most common use cases, but pgroll's capabilities are far more extensive. It provides a comprehensive suite of declarative operations for fine-grained schema control, including:
- Table Management:
create_table,drop_table, andrename_table. - Column Manipulation:
add_column,drop_column, and a powerfulalter_columnoperation for changing types, nullability, defaults, and comments. - Indexes and Constraints: Full lifecycle management for indexes and constraints, including
create_index,drop_index,create_constraint,drop_constraint, andrename_constraint. - Raw SQL Escape Hatch: An
sqloperation for executing custom DDL or handling advanced scenarios not covered by the declarative operations.
For a complete list of all operations and their detailed parameters, it is highly recommended to consult the official pgroll Operations Reference.
Create table
To create a new table, you can use the create_table operation. This operation allows you to define the table name and its columns, including types and constraints.
operations:
  - create_table:
      name: products
      columns:
        - name: id
          type: serial
          pk: true
        - name: name
          type: varchar(255)
          unique: true
        - name: price
          type: decimal(10,2)
Add column
Creating a new column in an existing table is straightforward with the add_column operation. You can specify the column name, type, and any default value.
operations:
  - add_column:
      table: reviews
      column:
        name: rating
        type: text
        default: '0'
Raw SQL (escape hatch)
For operations not natively supported, you can use raw SQL. Be aware that these operations do not come with pgroll's zero-downtime guarantees and should be used with caution.
operations:
  - sql:
      up: CREATE TABLE users (id INTEGER PRIMARY KEY, name TEXT)
      down: DROP TABLE users
Conclusion
pgroll provides a practical solution for Postgres schema migrations by using a declarative, multi-version approach. This method automates complex updates, turning them into a safer and more predictable workflow.
The core benefits are the ability to achieve zero-downtime deployments and perform instant rollbacks, which reduces the risk associated with production schema changes. While this requires adapting deployment strategies to manage the search_path in client applications, the trade-off results in a more reliable migration process.
For organizations that prioritize high availability and continuous delivery, pgroll offers a valuable framework for evolving database schemas safely.
Resources
- pgroll GitHub Repository
- pgroll Official Documentation
- Introducing pgroll: zero-downtime, reversible, schema migrations for Postgres
- Postgres Schema Search Path Documentation
Need help?
Join our Discord Server to ask questions or see what others are doing with Neon. For paid plan support options, see Support.