Azure Blob Storage is Microsoft's object storage solution for the cloud. It's optimized for storing massive amounts of unstructured data, such as text or binary data, including images, documents, streaming media, and archive data.
This guide demonstrates how to integrate Azure Blob Storage with Neon by storing file metadata (like the blob name and URL) in your Neon database, while using Azure Blob Storage for file storage.
Prerequisites
Create a Neon project
- Navigate to pg.new to create a new Neon project.
- Copy the connection string by clicking the Connect button on your Project Dashboard. For more information, see Connect from any application.
Create an Azure account, storage account, and container
-
Sign up for or log in to your Azure Account.
-
Navigate to Storage accounts in the Azure portal.
-
Click + Create. Fill in the required details: select a Subscription, create or select a Resource group, provide a unique Storage account name (e.g.,
myneonappblobstorage), choose a Region (e.g.,East US), and select performance/redundancy options (Standard/LRS is fine for this example). Click Review + create, then Create.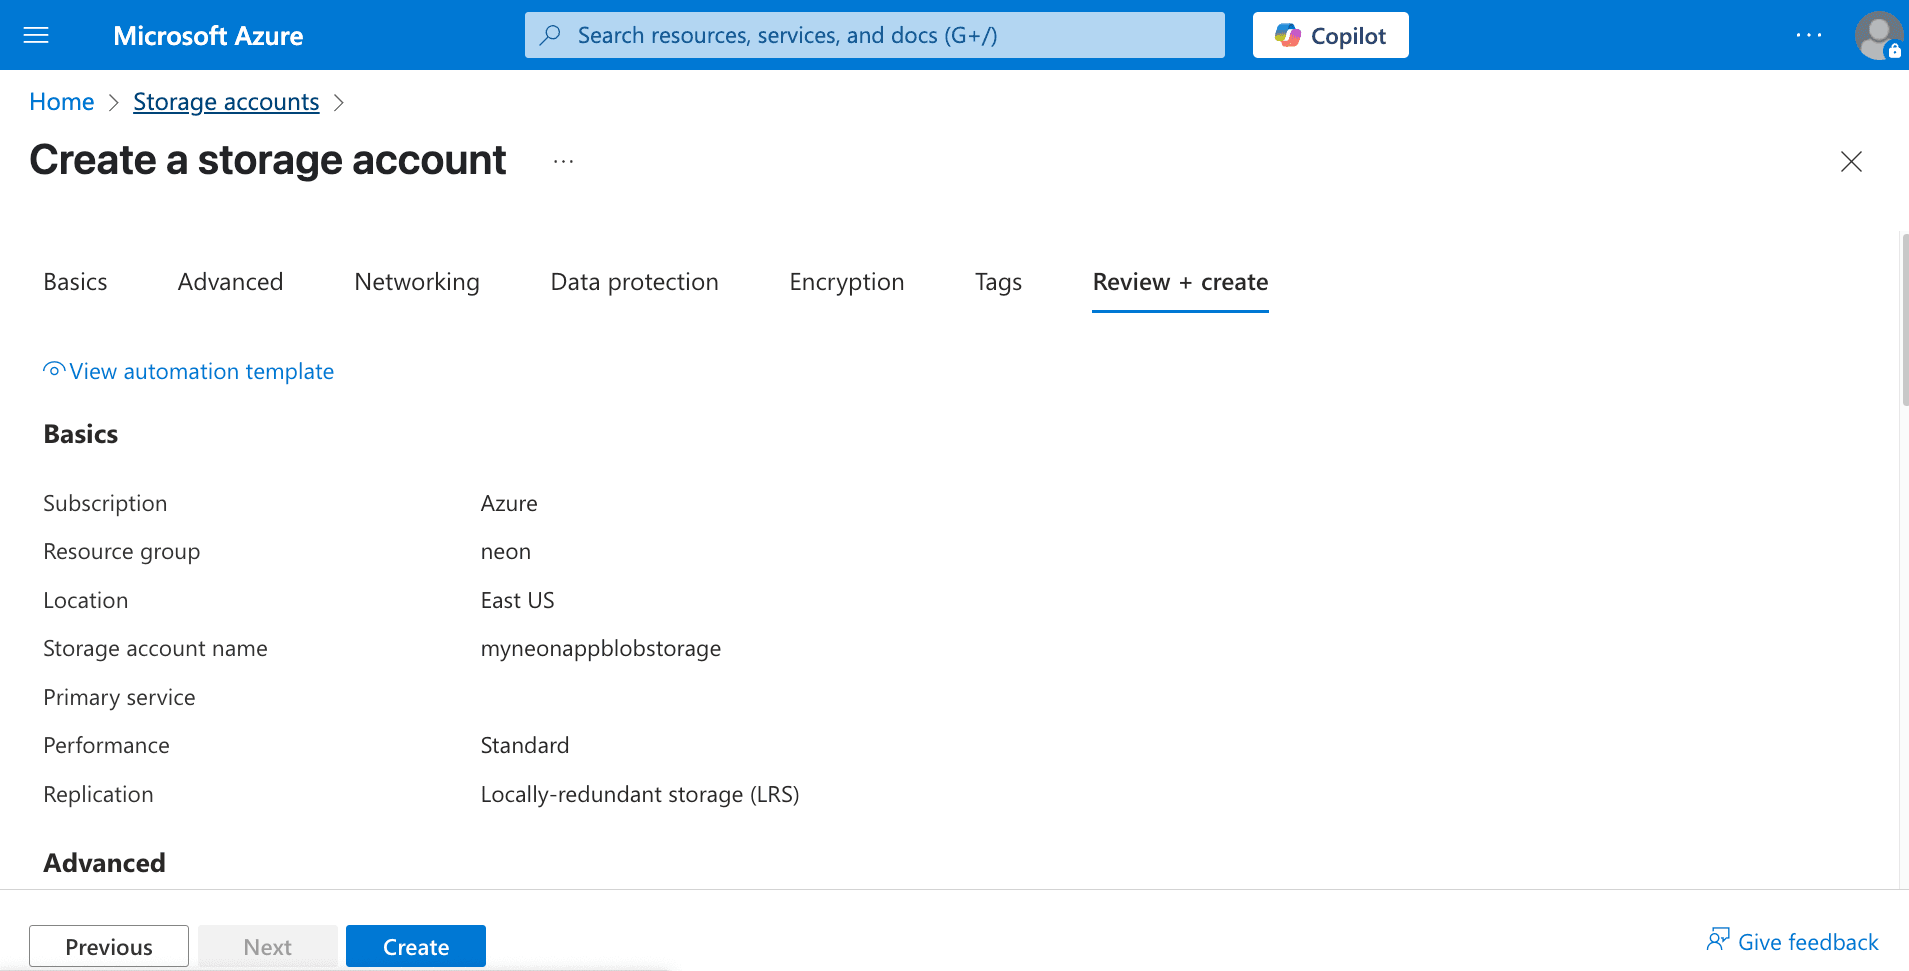
-
Once the storage account is deployed, go to the resource.
-
In the storage account menu, under Data storage, click Containers.
-
Click + Container. Provide a name for your container (e.g.,
uploads), set the Public access level to Private (no anonymous access). This is the recommended setting for security; we will use SAS tokens for controlled access. Click Create.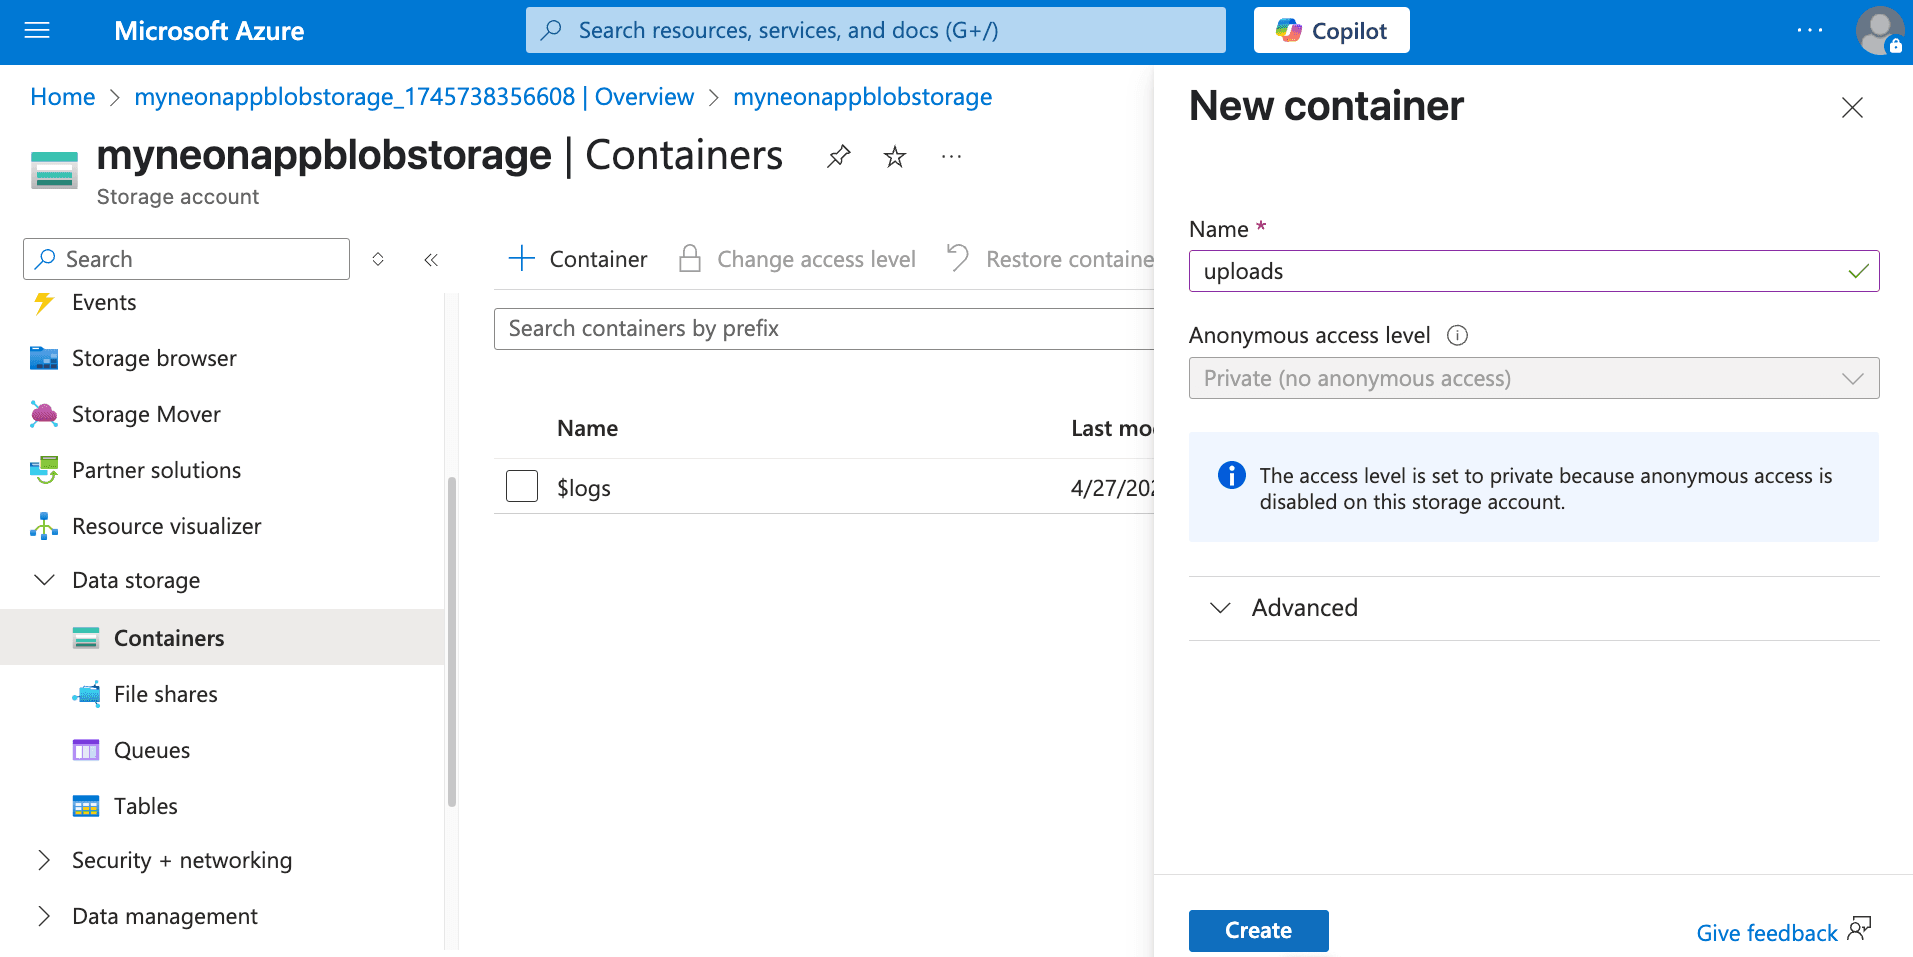
Public access vs. SAS tokens
While you can set container access levels to allow public read access (
BloborContainer), it's generally more secure to keep containers private and use Shared Access Signatures (SAS) tokens for both uploads and downloads. SAS tokens provide temporary, granular permissions. This guide focuses on using SAS tokens for uploads. For serving files, you can either generate read-only SAS tokens on demand or, if needed, set the container to publicBlobaccess. -
Get connection string:
- In your storage account menu, under Security + networking, click Access keys.
- Copy one of the Connection strings. This will be used by your backend application to authenticate with Azure Blob Storage. Store it securely.

-
Configure CORS for client-side uploads
If your application involves uploading files directly from a web browser using the generated SAS URLs, you must configure Cross-Origin Resource Sharing (CORS) on your Azure Storage account. CORS rules tell Azure Storage which web domains are allowed to make requests (like
PUTrequests for uploads) to your blob service endpoint. Without proper CORS rules, browser security restrictions will block these direct uploads.Follow Azure's guide to Configure CORS for Azure Storage. You can configure CORS rules via the Azure portal (Storage account > Settings > Resource sharing (CORS) > Blob service tab).
Here’s an example CORS configuration allowing
PUTuploads andGETrequests from your deployed frontend application and your local development environment:-
Allowed origins:
https://your-production-app.com,http://localhost:3000(Replace with your actual domains/ports) -
Allowed methods:
PUT,GET -
Allowed headers:
*(Or be more specific, e.g.,Content-Type,x-ms-blob-type) -
Exposed headers:
* -
Max age (seconds):
3600(Example: 1 hour)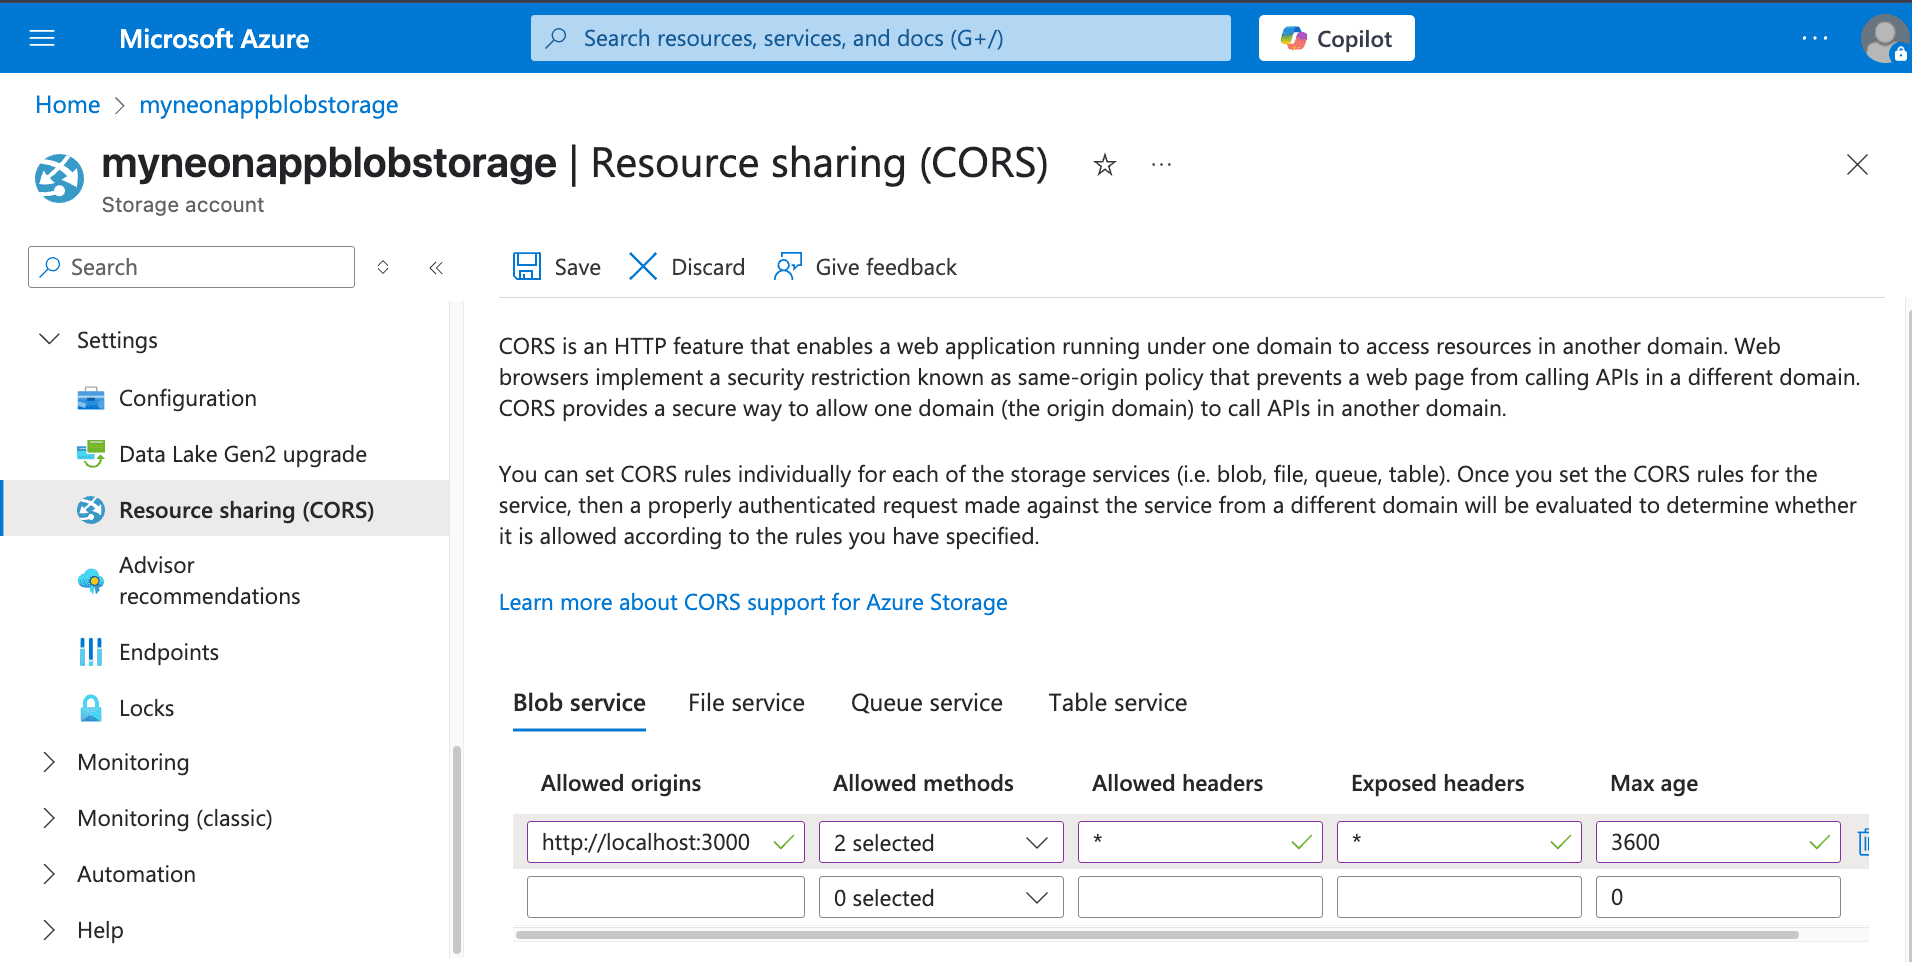
-
Create a table in Neon for file metadata
We need a table in Neon to store metadata about the blobs uploaded to Azure Storage.
-
Connect to your Neon database using the Neon SQL Editor or a client like psql. Create a table including the blob name, URL, user ID, and timestamp:
CREATE TABLE IF NOT EXISTS azure_files ( id SERIAL PRIMARY KEY, blob_name TEXT NOT NULL UNIQUE, -- Name (path/filename) in Azure Blob Storage container file_url TEXT NOT NULL, -- Publicly accessible URL (base URL, SAS might be needed for access) user_id TEXT NOT NULL, -- User associated with the file upload_timestamp TIMESTAMPTZ DEFAULT NOW() ); -
Run the SQL statement. Add other relevant columns as needed (e.g.,
content_type,size).
Securing metadata with RLS
If you use Neon's Row Level Security (RLS), remember to apply appropriate access policies to the
azure_filestable. This controls who can view or modify the object references stored in Neon based on your RLS rules.Note that these policies apply only to the metadata in Neon. Access control for the blobs within the Azure container itself is managed via Azure RBAC, SAS tokens, and container access level settings.
-
Upload files to Azure Blob Storage and store metadata in Neon
The recommended pattern for client-side uploads to Azure Blob Storage involves SAS (Shared Access Signature) URLs. Your backend generates a temporary URL containing a SAS token that grants specific permissions (like writing a blob) for a limited time. The client uses this SAS URL to upload the file directly to Azure Blob Storage. Afterwards, your backend saves the file's metadata to Neon.
This requires two backend endpoints:
/generate-upload-sas: Generates the temporary SAS URL for the client./save-metadata: Records the metadata in Neon after the client confirms successful upload.
We'll use Hono for the server,
@azure/storage-blobfor Azure interaction, and@neondatabase/serverlessfor Neon.First, install the necessary dependencies:
npm install @azure/storage-blob @neondatabase/serverless @hono/node-server hono dotenvCreate a
.envfile:# Azure Blob Storage Config AZURE_STORAGE_CONNECTION_STRING="your_storage_account_connection_string" AZURE_STORAGE_CONTAINER_NAME=your_container_name # e.g., uploads # Neon Connection String DATABASE_URL=your_neon_database_connection_stringThe following code snippet demonstrates this workflow:
import { serve } from '@hono/node-server';
import { Hono } from 'hono';
import {
  BlobServiceClient,
  generateBlobSASQueryParameters,
  BlobSASPermissions,
  SASProtocol,
} from '@azure/storage-blob';
import { neon } from '@neondatabase/serverless';
import 'dotenv/config';
import { randomUUID } from 'crypto';

const AZURE_CONNECTION_STRING = process.env.AZURE_STORAGE_CONNECTION_STRING;
const AZURE_CONTAINER_NAME = process.env.AZURE_STORAGE_CONTAINER_NAME;
const blobServiceClient = BlobServiceClient.fromConnectionString(AZURE_CONNECTION_STRING);
const containerClient = blobServiceClient.getContainerClient(AZURE_CONTAINER_NAME);

const sql = neon(process.env.DATABASE_URL);
const app = new Hono();

// Replace this with your actual user authentication logic, by validating JWTs/Headers, etc.
const authMiddleware = async (c, next) => {
  c.set('userId', 'user_123');
  await next();
};

// 1. Generate SAS URL for upload
app.post('/generate-upload-sas', authMiddleware, async (c) => {
  try {
    const { fileName, contentType } = await c.req.json();
    if (!fileName || !contentType) throw new Error('fileName and contentType required');

    const blobName = `${randomUUID()}-${fileName}`;
    const blobClient = containerClient.getBlockBlobClient(blobName);
    const fileUrl = blobClient.url;

    const sasOptions = {
      containerName: AZURE_CONTAINER_NAME,
      blobName: blobName,
      startsOn: new Date(),
      expiresOn: new Date(new Date().valueOf() + 300 * 1000), // 5 minutes expiry
      permissions: BlobSASPermissions.parse('w'), // Write permission
      protocol: SASProtocol.Https,
      contentType: contentType,
    };

    const sasToken = generateBlobSASQueryParameters(
      sasOptions,
      blobServiceClient.credential
    ).toString();
    const sasUrl = `${fileUrl}?${sasToken}`;

    return c.json({ success: true, sasUrl, blobName, fileUrl });
  } catch (error) {
    console.error('SAS Generation Error:', error.message);
    return c.json({ success: false, error: 'Failed to prepare upload URL' }, 500);
  }
});

// 2. Save metadata after client upload confirmation
app.post('/save-metadata', authMiddleware, async (c) => {
  try {
    const { blobName, fileUrl } = await c.req.json();
    const userId = c.get('userId');
    if (!blobName || !fileUrl) throw new Error('blobName and fileUrl required');

    await sql`
      INSERT INTO azure_files (blob_name, file_url, user_id)
      VALUES (${blobName}, ${fileUrl}, ${userId})
    `;
    console.log(`Metadata saved for Azure blob: ${blobName}`);
    return c.json({ success: true });
  } catch (error) {
    console.error('Metadata Save Error:', error.message);
    return c.json({ success: false, error: 'Failed to save metadata' }, 500);
  }
});

const port = 3000;
serve({ fetch: app.fetch, port }, (info) => {
  console.log(`Server running at http://localhost:${info.port}`);
});
Explanation
- Setup: Initializes Neon client (
sql), Hono (app), and AzureBlobServiceClientusing the connection string. - Authentication: Placeholder
authMiddlewareneeds replacing with actual user validation. - Upload endpoints:
/generate-upload-sas: Creates a uniqueblobName, gets aBlockBlobClient, and generates a SAS token usinggenerateBlobSASQueryParameterswith write permissions (w) and a short expiry. It returns the fullsasUrl(base URL + SAS token), theblobName, and the basefileUrl./save-metadata: Called by the client after successful upload. Saves theblobName, basefileUrl, anduserIdinto theazure_filestable in Neon.
Testing the upload workflow
Testing the SAS URL flow involves multiple steps:
-
Get SAS URL: Send a
POSTrequest to your/generate-upload-sasendpoint with a JSON body containingfileNameandcontentType. Using cURL:curl -X POST http://localhost:3000/generate-upload-sas \ -H "Content-Type: application/json" \ -d '{"fileName": "test-azure.txt", "contentType": "text/plain"}'You should receive a JSON response with a
sasUrl,blobName, andfileUrl:{ "success": true, "sasUrl": "https://<ACCOUNT_NAME>.blob.core.windows.net/<CONTAINER>/<BLOB_NAME>?<SAS_TOKEN>", "blobName": "<BLOB_NAME>", "fileUrl": "https://<ACCOUNT_NAME>.blob.core.windows.net/<CONTAINER>/<BLOB_NAME>" }Note the
sasUrl,blobName, andfileUrlfrom the response. You will use these in the next steps. -
Upload file to Azure: Use the received
sasUrlto upload the actual file using an HTTPPUTrequest. You also need to set theContent-Typeheader to match what was specified during SAS generation andx-ms-blob-type: BlockBlob. Using cURL:curl -X PUT "<SAS_URL>" \ --upload-file /path/to/your/test-azure.txt \ -H "Content-Type: text/plain" \ -H "x-ms-blob-type: BlockBlob"A successful upload returns HTTP
201 Created. -
Save metadata: Send a
POSTrequest to your/save-metadataendpoint with theblobNameand basefileUrlfrom step 1. Using cURL:curl -X POST http://localhost:3000/save-metadata \ -H "Content-Type: application/json" \ -d '{"blobName": "<BLOB_NAME_FROM_STEP_1>", "fileUrl": "<FILE_URL_FROM_STEP_1>"}'You should receive a JSON response indicating success:
{ "success": true }
Expected outcome:
- The file appears in your Azure Blob Storage container (check the Azure Portal).
- A new row appears in your
azure_filestable in Neon.
You can now integrate API calls to these endpoints from various parts of your application (e.g., web clients using JavaScript
fetchAPI, mobile apps, backend services) to handle file uploads.-
Accessing file metadata and files
Storing metadata in Neon allows your application to easily retrieve references to the files hosted on Azure Blob Storage.
Query the
azure_filestable from your application's backend when needed.Example SQL query:
Retrieve files for user 'user_123':
SELECT
    id,
    blob_name,       -- Name (path/filename) in Azure container
    file_url,        -- Base URL of the blob
    user_id,         -- User associated with the file
    upload_timestamp
FROM
    azure_files
WHERE
    user_id = 'user_123'; -- Use actual authenticated user ID
Using the data:
-
The query returns metadata stored in Neon.
-
The
file_urlcolumn contains the base URL of the blob. -
Accessing the file:
- If your container allows public
Blobaccess, thisfile_urlmight be directly usable. - If your container is private (recommended), you need to generate a read-only SAS token for the specific
blob_nameon demand using your backend (similar to the upload SAS generation, but withBlobSASPermissions.parse("r")orBlobSasPermissions(read=True)) and append it to thefile_url. This provides secure, temporary read access. - Use the resulting URL (base URL or URL with read SAS token) in your application (e.g.,
<img>tags, download links).
For example here's how to generate a read SAS URL:
import {
  BlobServiceClient,
  generateBlobSASQueryParameters,
  BlobSASPermissions,
  SASProtocol,
} from '@azure/storage-blob';
const AZURE_CONTAINER_NAME = process.env.AZURE_STORAGE_CONTAINER_NAME;

const blobServiceClient = BlobServiceClient.fromConnectionString(
  process.env.AZURE_STORAGE_CONNECTION_STRING
);

async function generateReadOnlySasUrl(blobName, expiryMinutes = 15) {
  const containerClient = blobServiceClient.getContainerClient(AZURE_CONTAINER_NAME);
  const blobClient = containerClient.getBlobClient(blobName);

  const sasOptions = {
    containerName: AZURE_CONTAINER_NAME,
    blobName: blobName,
    startsOn: new Date(),
    expiresOn: new Date(new Date().valueOf() + expiryMinutes * 60 * 1000),
    permissions: BlobSASPermissions.parse('r'), // Read ('r') permission
    protocol: SASProtocol.Https,
  };

  const sasToken = generateBlobSASQueryParameters(
    sasOptions,
    blobServiceClient.credential
  ).toString();

  const sasUrl = `${blobClient.url}?${sasToken}`;
  return sasUrl;
}

// Replace '<BLOB_NAME_FROM_DB>' with the actual blob name
generateReadOnlySasUrl('<BLOB_NAME_FROM_DB>')
  .then((url) => {
    console.log('Read-only SAS URL:', url);
  })
  .catch((error) => {
    console.error('Error generating read SAS URL:', error);
  });
Private containers & read access
For private containers, always generate short-lived read SAS tokens when a user needs to access a file. Store only the
blob_nameand basefile_url(or justblob_name) in Neon, and construct the full SAS URL in your backend when serving the file reference to the client. - If your container allows public
This pattern effectively separates file storage and delivery concerns (handled by Azure Blob Storage) from structured metadata management (handled by Neon), leveraging the strengths of both services.
-
Resources
- Azure Blob Storage documentation
- Azure Storage Shared Access Signatures (SAS)
- Neon Documentation
- Neon RLS
Need help?
Join our Discord Server to ask questions or see what others are doing with Neon. For paid plan support options, see Support.